Tuesday, March 30, 2010

And the Winner Is...

The Vintage Attic.

Please email me, cchoover1@yahoo.com with some ideas on a sign you might like. Thank you all for entering, you all mean so much to me. THANK YOU!

Sunday, March 28, 2010

Don't Forget...

to enter for a chance to win a custom sign. Leave a comment here. Time is almost up.


Thursday, March 25, 2010

Numbered Dresser

I found this little beauty and immediately saw numbers, 1 to 5.
a fresh coat of black paint, and of course some numbers.
Lined the inside with old book pages.
I also painted a diamond design on top but I forgot to take a picture before it was placed in the window. My vision came true, I love it.
I am linking up to:

My Romantic Home - Show and Tell Friday

Mustard Seed Creation - Furniture Feature Friday

Funky Junk Interiors - Saturday Night Special


I hung the frames as is last night. I need to find a few more to fill in the space. But so far so good. Sorry about the picture the sun wasn't cooperating. As you can see we still haven't finished that mini dresser (not sure what else to call it and when I say we I really mean Chris, ha ha)

Doing that I had to find a new home for this. It made it's way to the kitchen. I had a wall full of plates here but for some reason over the last few day they are all falling off the wall. Some have broke. It may have to do with the door that the kids might slam on occasion. So I put all the plates in that heavy duty plastic plate holder. I have been on the search for an old chicken feeder to put all my plates in.
My friend Rick from the shops gave me a great deal on some old keys. Just love them!
This one is my favorite, room number and all.
The sun is shining so it will be a beautiful day! Don't forget about the anniversary giveaway.

Wednesday, March 24, 2010

Framed

I am in love with these frames. I found one and really liked it and now I seem to be finding them everywhere, or are they finding me? I paid less then $10 for these three frames, I think I got a good deal. I am pleased. They are always gold. Why? Anyone know.
I am debating painting them white, as I would love to group them together on a wall.
I just love how chippy they are.
If you haven't already, don't forget to sign up for a chance to win a custom sign.

Tuesday, March 23, 2010

Anniversay Giveaway!

I am a bit late, but you know what they say, better late then never. It is so hard to believe I have been blogging for over a year now. I started the journey on February 21, 2009. I am so glad that I did and I have found so many amazing, creative and lovely souls! It still amazes me that I have found others who love the same things I do. 
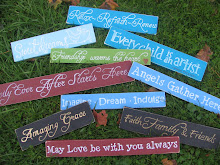
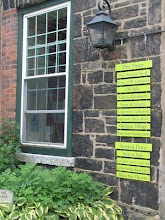
I am giving away a sign! Surprise Surprise right?!? The winner will get to choose colors, font and of course what they want their sign to say.
Just leave me a comment on this post for you chance to win. The giveaway will close 03/30/2010 at 5 pm est.


GOOD LUCK and thank you all so much!


Sunday, March 21, 2010

Diamond Tutorial

As promised, here is a tutorial on how I paint my diamonds. There may be other more "proper" ways, but this works the best for me. First find something to paint on. I have this end table that I wanted to do in white and aqua. You will need to find a ruler or a piece for wood. I prefer using a longer piece of wood so that it will go the full length of the furniture. Mine is 4 inches wide, that seems to create the best sized diamond.


First, lay the piece of wood from corner to corner and trace both sides with a pencil.
Move the board down, lining it up to the previous pencil mark. Trace the other side.
Repeat that until you reach the end the the funiture
Go back the the center, line the board up to your pencil mark and do the same thing.


Go back to the center and go corner to corner on the opposite side. Trace the board again on both sides. This is how you will create the diamond.
Move your way across the furniture again.


Once you have done that, as you can see you have created identical diamonds.
I usually mark with an "x" the ones that I will be painting.
You could just paint the diamonds free hand but I prefer clean lines, so I tape mine. I place the tape on the outside of the lines I am painting.
Grab your paint.
Paint them in.
Remove your tape and allow time for your paint to dry before painting the other diamonds.
Tape off the remaining diamonds, and paint.
Once your done, you can enjoy a beautiful hand painted piece of furniture.

I would love to see all your finished diamond projects. Of course if you have any questions, just ask.

Thursday, March 18, 2010

Pretty in Pink

Remember this sweet little sewing table? I just loved the scallop edge! Instead on reinventing this into a writng desk and or laptop desk I decided to keep it for its original purpose, to house a sewing machine. Alice who was kind enough to pass this on to me has the sewing machine and it still works. We thought it would make a great functional display piece in a sewing/craft room.
Here it is after, pretty in pink. The sewing machine is brown so I thought brown, white and pink a perfect combination! I went whimsical and had lots of fun!
Diamond design on top and some circles on the sides.
Diamond design inside, sorry the sewing machine hasn't been added. I will share another photo once it has.
My favorite part are the stripes when you open the front.
I am please how it turned out and it will look great in any sewing/craft room. I get lots of questions on how I paint my diamonds so I decided to do a tutorial. It is super easy, watch for it over the weekend! You will all be painting diamonds everywhere!

I am linking up to:


Wednesday, March 17, 2010

Touches of color

With the beautiful weather we have been having, some touches of color were called for. Love the Aqua frame and red polka dots!
Some Red in a one of a kind sign.
More Aqua, green and pink
and a gorgeous blue bench

Monday, March 15, 2010

Whimsical Table

Remember all that furniture I received from my friend? I am finally getting around to painting some of it. This little table was a challenge. At first I was going to paint a chess/checkers board in the middle. That didn't work out as I had envisioned it.
So I went with something a little more whimsical.
What do you think?